Outdated or Unsupported Browser Detected
DWD's website uses the latest technology. This makes our site faster and easier to use across all devices. Unfortunatley, your browser is out of date and is not supported. An update is not required, but it is strongly recommended to improve your browsing experience. To update Internet Explorer to Microsoft Edge visit their website.
Unemployment Insurance Employer Handbook (UCB-201-P)
Section 4 - Wage Reporting
The online tax and wage reporting application can accept and process text files in a tab-delimited format that is similar to our WI UI Format. This allows employers and agents who maintain and submit quarterly wage data using Excel to convert an Excel file to a tab-delimited text format in order to upload a wage report file online. Following are instructions for converting a wage report from an Excel format to a tab-delimited format accepted by the online reporting application. Your Excel window appearances/layouts may vary by version:
The Excel file must include the same data required for the WI UI Format (Alternative 1), organized in the following manner:
| Location | Field | Length | Description & Remarks |
|---|---|---|---|
| A | Employer UI Account Number | 10* | Enter Your 10-digit UI Account Number without dashes or spaces. (Example: If your account number is 123456-000-7, column A should contain 1234560007). |
| B | Reporting Period Quarter Year (QYY) |
3 | Enter Quarter and Year to which this report applies (e.g., 319 for the third quarter of 2019). |
| C | Social Security Number | 9* | Enter the 9-digit Social Security Number with no spaces or dashes. If not available, fill with zeroes**. |
| D | Last Name | 10 | Enter the last name for the employee. Please note that the last name column must precede the first name column. |
| E | First Name | 8 | Enter the first name for the employee. |
| F | Employee Quarterly UI Total Gross Wages | 9 | Enter the employee's quarterly wages including a decimal point to show dollars and cents. Do not report negative wage amounts or use "+" to indicate a positive wage amount. |
| G | Record Code | 2* | Should ALWAYS contain "01." If possible, do not format the column to truncate leading zeroes; using the text format for this column is recommended. |
*These fields must contain a specific number of digits. See below Custom Format in Excel section.
**Files with too many zero-filled SSN records will be rejected in the nightly file processing.
Note: The wage amounts in the Excel file must contain decimal points for the file format to be valid. In order to ensure that decimal points are not automatically dropped from your wage amounts (e.g., 200.00 to 200) when saving the file to the tab-delimited format, make sure that Column F in the Excel file is formatted properly. Highlight the wage amounts in that column and right click to select Format Cells. In the Number tab, select Number in the Category list. Leave the default selections. The wage amounts should be formatted with 2 decimal places, no commas.
Below is an example of an Excel wage report file that is formatted according to the specifications above:
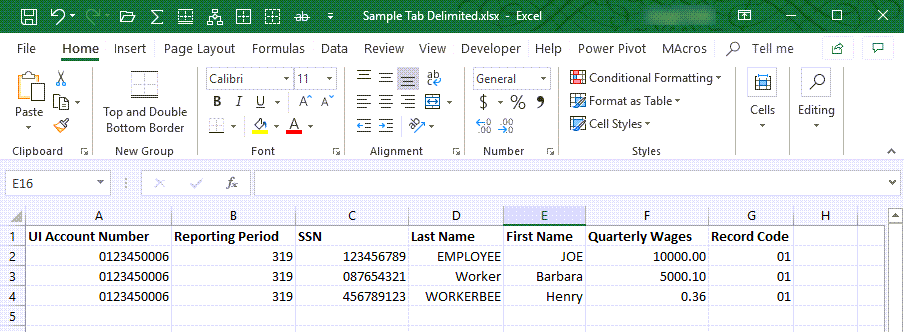
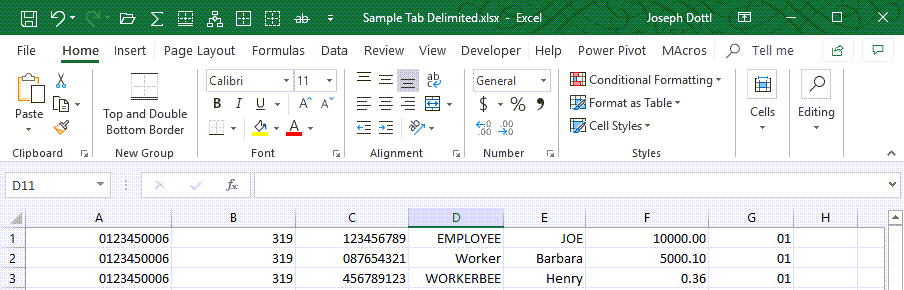
Note that in the above example, the column headings in row 1 are included only to denote what data belong in each column. The headings must be removed prior to saving the file in the tab-delimited format so the file looks like the following example:
Do not combine the last and first name in one column. Omit titles, e.g., Mr., Mrs., Ms., DR or MD, from the name field(s). Do not use punctuation. Parts of a compound surname must be connected by a hyphen. Do not separate leading letters (e.g., "O," "Mc," etc...) from the rest of the surname. Middle initials (if included) must be entered as part of the first name, after the first name (e.g., BEN A). If an employee has just one name (e.g., Cher), enter it in the Last Name column. If a numeric suffix applies, use roman numerals (e.g., II, III, IV, V). The following screenshot shows examples of acceptable name entries using columns D and E:

(Note: Excel may have trouble with this method of saving as a tab-delimited format if your data was populated from a report and manipulated into the correct columns/layout. Method 2 below should work for all scenarios.)
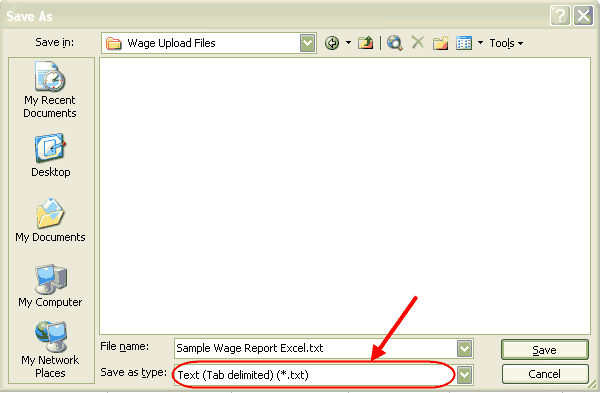
In your Excel file, select File > Save As to bring up the Save as window.
In the Save in field, browse to the desired location on your PC to which to save your file. Then enter a file name in the File name field. In order to convert your Excel file to a tab-delimited format, use the down arrow in the Save as type field and choose Text (Tab delimited)(*.txt) from the list of file types.
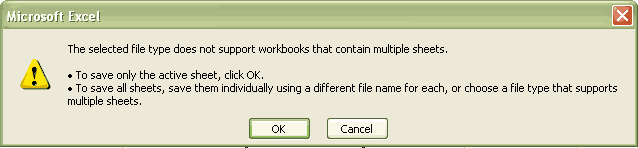
You may receive a warning about the file type not supporting workbooks with multiple sheets. Click OK to save only the active sheet.
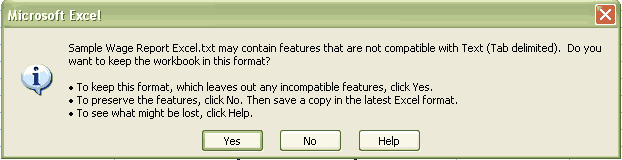
If you receive a warning about the file containing features not compatible with Text (Tab delimited), click Yes to keep this format.
You have now created a tab-delimited text file that contains your wage report data. Locate the text (.txt) file you saved in the location to which you saved it on your PC.
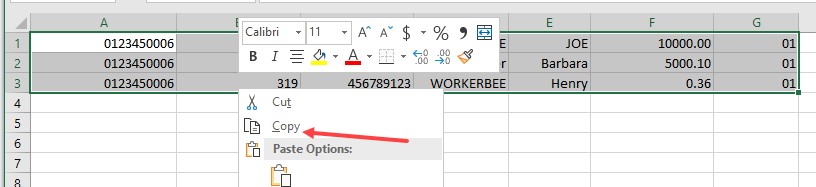
In Excel, highlight/select all of your data from the top-left account number down to the bottom-right "01". You should only have selected cells that actually contain wage records. Then "copy" that highlighted section (Either right-click and select copy or Ctrl+C).
With the data copied, open up a new session of Notepad. Located in the "Accessories" folder of the start menu normally.
In Notepad, "paste" the copied information.
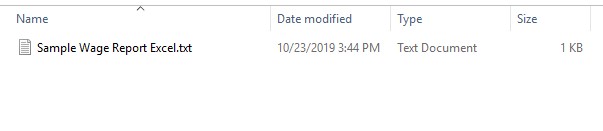
After you have saved the file through one of the two above methods, you should have the file saved to your computer in a .txt format.
If you open the text file, it should look similar to the example text file below:
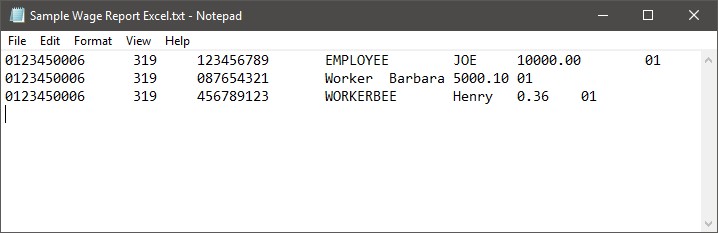
You can see in the above text file example that not all of the columns line up. Your first 4 columns (account number, QYR, SSN, and Last name) should line up. Subsequent columns may not. All of the individual data elements in each row are still separated by a tab, so the system will still be able to process the data elements correctly.
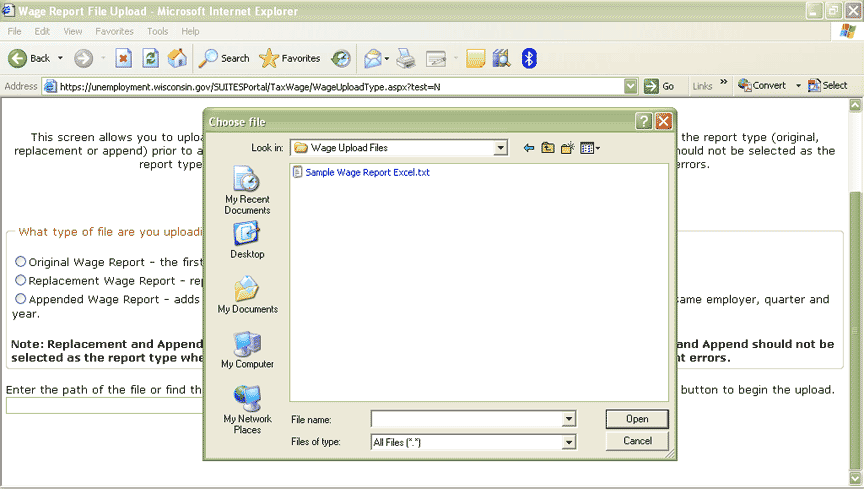
You are now ready to upload your text wage report file using the online Tax and Wage Reporting System. To do this, visit our website at https://dwd.wisconsin.gov/uitax. Select the link to File Tax and Wage Reports and login to the online reporting application. Access the Wage Report File Upload screen, enter the required contact information and click on Next. Then select the type of file you are uploading (Original, Replacement or Append – you will almost always be selecting "Original"). Then click on the Browse button to locate the tab-delimited wage report text file you created and saved on your PC.
Once you have attached your wage report file, click on the Submit button. You can also test your wage report file before submitting it to satisfy quarterly reporting requirements using our Test Wage Report File Upload screen, also located in the online Tax and Wage Reporting system. By uploading a wage report file using the Test Wage Report File Upload screen, you can test your file to make sure the file format is correct and that it does not contain content errors that would cause any report(s) within the file to be rejected.
For fields like Account number, Social Security Number, and the record code that require a very specific length of characters, applying a format to that column in Excel can be beneficial. To apply a custom format, highlight the column or cells, right-click, and select "Format Cells…" In the window that pops up, select the first tab that indicates "Number". Select the "Custom" Category. In the "Type" field, you can pre-fill a set number of zeros to force the cells to be at least that length with preceding zeros. So, for the 10-digit account number, you can use 10 zeros (i.e. 0000000000). For Social Security Number, you can use 9 zeros (i.e. 000000000). For record code, 2 zeros (i.e. 00).

If you have further questions regarding uploading wage report files or
converting Excel files to a tab-delimited format, you may contact us at the
following phone number and email address:
By Phone: (608) 266-6877, Monday -
Friday, 8:00 AM to 4:00 PM
By Email: wagenet@dwd.wisconsin.gov
Updated: August 19, 2024
Content Contact: UI Wage Reporting
DWD Contact Information
201 E. Washington Ave
P.O. Box 7946
Madison, WI 53707
(608) 266-3131
Sign up for DWD news and updates
A proud partner of the ![]() network
network